


Document Actions
gvSIG-Desktop 1.10. User Manual
- General preferences
- Introduction
- Extension directory
- Appearance
- Folders
- Display configuration
- Web browser
- Activate/Deactivate Extensions
- Translator Manager
- Introduction
- Changing the application language
- The import/export file
- To install or update a language translation
- Uninstall a language translation
- Exporting a language translation to update it
- Exporting to translate to a new language
- Preferencias. Generar backup del gvp
General preferences
Introduction
This tool establishes whether gvSIG needs to remember the project windows’ position and size.
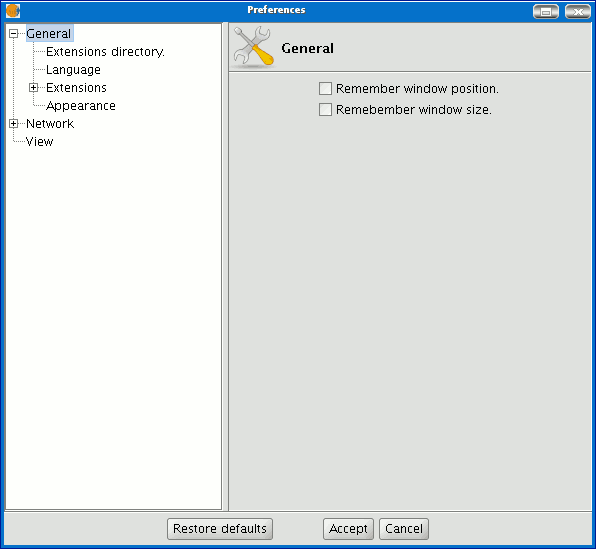
If you pull down the tree (click on “+”), the properties you can configure in “General” will appear.
Extension directory
This tool defines the directory for the extensions that gvSIG must use.

Appearance
You can use this tool to modify gvSIG’s appearance. Pull down the box with the available options and select the required option.
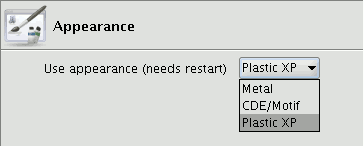
N.B.: You will have to restart gvSIG for this change to take effect.
Folders
You can use this option to create a shortcut to the folders your projects (.gvp), data (raster and vector) or templates (.gvt) are saved in.
Display configuration
You can specify the points per inch for your display in the “Resolution” text box.
gvSIG allows you to calculate the exact resolution of your display as follows:
Place a ruler on the screen to measure the straight line drawn in the “Test measurement” box.
Write the measurement obtained in the text box underneath (the value 5.61 has been inserted in this example) and the units in which this measurement was taken (“Centimetres” in our case).
Click on the “Calculate resolution” button.
gvSIG automatically provides a points per inch value for the resolution of your display.
This appears in the corresponding text box (the result in our case is 95ppi).
Web browser
This allows a default web browser (for the Linux operating system) to be specified for any search carried out from gvSIG to any of the hyperlinks found in the application.
The first option contains the pull-down menu in which the different supported browsers are located.
The second option can be used to specify which browser you want to open the different URLs included in the application such as the URLs in the “Help” menu (Example: firefox %www.gvsig.gva.es).
Activate/Deactivate Extensions
This allows you to configure the extensions that gvSIG uses while running. Pull down the extension tree and select the required extension.
A description of the selected extension is displayed. You can activate or deactivate the extension and modify its order of priority in the list.
N.B.: If you activate an extension, you will have to restart gvSIG to use it.
Translator Manager
Introduction
gvSIG has support for showing the application's text based on a language selection, that by default it is usually the same as for the operating system but that the user may change through the language preferences panel.
Translations to new languages have been added to every new released version of gvSIG, especially thanks to the support of the community and the translators involved.
However, to add a ne language, make corrections or finish the translation of one of the languages available, it has been necessary to wait to the release of the new version of gvSIG.
However, to add a new language, make corrections or finish the translation of one of the languages available, it has been necessary to wait to the release of the new version of gvSIG.
The translation manager extension will allow gvSIG users to append translations to new languages and updates to the existing ones over a version already installed with the application, without having to reinstall it. This way, there will be the possibility to publish translations to new languages from within gvSIG, without having to wait for the following gvSIG version.
Furthermore, the extension will let any gvSIG user to update or translate to a new language the application chains and will allow checking the result over the application itself without having to resort to a programmer.
Upon installing the translation manager extension, the language selection panel will be replaced by a new preference panel in which besides being able to select the application language, there will be a series of buttons to perform the language translation.
With the new translation manager, the extension adds the option to distinguish the translations, not only by language but by country and other variants as well. This is due to the fact that for some languages there are differences between countries (e.g. English from United Kingdom vs. United States) and even variants within the same country (e.g. Norwegian Nynorsk alongside Riksmål).
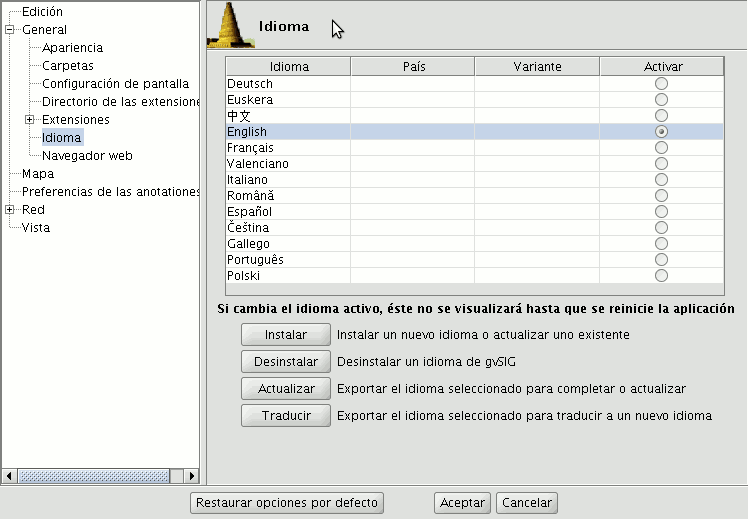
The following figure shows the translation manager panel with the language preference panel:

Language Preference Panel
The panel shows upon selecting the option Idioma (1), from within the General section of the gvSIG preferences. A table with the list of available translations to languages will show in the upper part inside the panel. The columns that show in the table are:
- Idioma (2): name of the language in its own language to facilitate its identification.
- País (3): language country
- Variante (4): language variant.
- Activar (5): selected language in which the application chains will be shown.
In the lower part of the table there are a number of buttons that allow managing the application translations. The task of those buttons, in general will be applied to the language selected in the table (6), selecting over the row of the table of the language that will be used.
The function of those buttons is as follow:
- Instalar (7): install or update a language translation.
- Desinstalar (8): uninstall a language translation.
- Actualizar (9): export the translation to a language to update it.
- Traducir (10): export to translate to a new language.
Changing the application language
To change the language of the application we go to the Activar column of the table and select the radio button of the row of the language we would like to visualize the application.
Changing the active language
In order to commit the change, we must click in the Aceptar button from the preferences window. The selected language will be installed next time gvSIG is started.
The import/export file
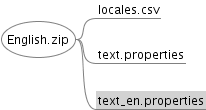
A compressed file with ZIP format will be used to install or export translations.
This file should always have, at least a file locales.csv with the list of translations that are contained in the ZIP file, as well as a .properties file with the labels and the translations for each of the languages contained in the locales.csv file.
Note: the files must obligatorily be on the root of the ZIP file and not inside any folder.
For example, a file with the translations to the German and English languages should have the following files:
Import or export translations file.
The locales.csv file serves to show the list of available translations in the ZIP file, indicating for each one of them those that are used as translation or updating reference, and those that are not.
The locales.csv file is in text format, with every language indicated in a line and the values separated by comma with the following format:
FILE_NAME,LANGUAGE_CODE,COUNTRY_CODE,VARIANT_CODE,REFERENCE (whether it is a reference language or not)
- File name: Properties that contain the translation to the language.
- Language Code: Two characters language ID according to the ISO 639 standard.
- Country Code: Two character country ID according to the ISO 3166 standard. Optional.
- Variant code: Variant ID. Optional.
- Reference: True in case it is a language used as reference, false if not. Upon importing a file, those with a true value will be ignored. Optional.
Optional fields are allowed to remain empty, but all fields must be separated by commas. If we would like to edit this file we could use any regular text editor or spreadsheet, as long as we keep the CSV comma delimited format.
The content of the locales.csv file in the initial example would be:
text.properties,es,,,true
text_en.properties,en,,,false
To install or update a language translation
To install the translation of a language or update one already existing, we need to have a compressed ZIP file saved in the file system. The ZIP file should include a properties file with the translated texts to that language.
To install a language translation, we will select Instalar from the language preferences. A file browser will open and we will look for the .zip file to be installed in our file system.
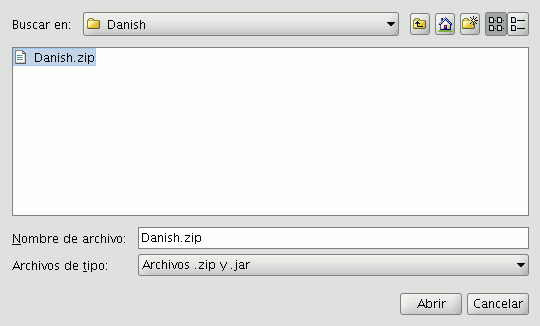
Selecting the .zip file to import.
Once the .zip file to be imported is selected, we will click in the Importar button and the file will be loaded by the application. Next gvSIG will let us know if the import was successful.

Import confirmation
If it is a language already installed in the application, the new translation will substitute the previous one. If on the other hand it is a new language, it will be installed and the new language will show up in the table of available languages.
Uninstall a language translation
If we would like to uninstall a translation to a language we will select from the table the row corresponding to the language and click the Desinstalar button.

Language uninstall confirmation
The application will ask for confirmation to uninstall the selected language. We can cancel, if we do not want to uninstall the language or accept, after which the corresponding text file will be erased and removed from the list.
Exporting a language translation to update it
If we want to complete or fix the translation of one of the available languages in gvSIG, we can use the export to update option.
For that we will select the row of the language we would like to update from the table and then click on the Actualizar button.
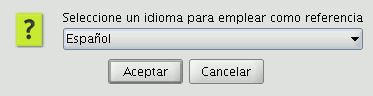
Selection of the reference language
We will be asked to select a reference language. Specially if we are going to complete a language translation, we will need another language that is complete from which we will translate the pending chains.

Saving exported file
Next there will be a dialog that will allow us to save the ZIP file with the export to a location within the file system of our computer. By default it will named in English with the .zip extension.
Once it is saved, we can unzip the zip file and to proceed to edit the language translation we would like to complete. The files with the text chains that are exported always have the following format:
text_[CODIGO-IDIOMA]_[CODIGO_PAIS]_[CODIGO-VARIANTE].properties
- CODIGO-IDIOMA: 2-letter ID for the language according to the ISO 639 standard.
- CODIGO_PAIS: 2-letter ID for the country according to the ISO 3166 standard.
- CODIGO-VARIANTE: variant ID.
The variant and country codes are optional. In the case of the Spanish language it will not have language code either since it is by default the base language in gvSIG.
Once the editing of the language translation to be completed is finished, we can create a new ZIP file with the content of the files extracted from the export zip file. It is important to include all the files since in the locales.csv file there is information that allows gvSIG to identify what language we are updating and which one is its properties file.
After that we could use the install or update a language options to install the changes as it is explained in the previous section.
Exporting to translate to a new language
If we want to translate the gvSIG interface to a new language we could ask the application to export a file with all the identifiers of the text chains to translate.
For that we first select a reference language, choosing the row corresponding to the selected language from the table. Like in the language updating option, besides the selected reference language we need to include the Spanish and English languages as well.
Next there will be a dialog that will allow us to select the new language we would like to translate to. Those languages appear in their native language to facilitate identification.
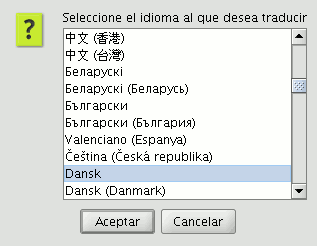
Select new language to translate
Once the language is selected, there will be a dialog asking where we would like to save the generated ZIP file.
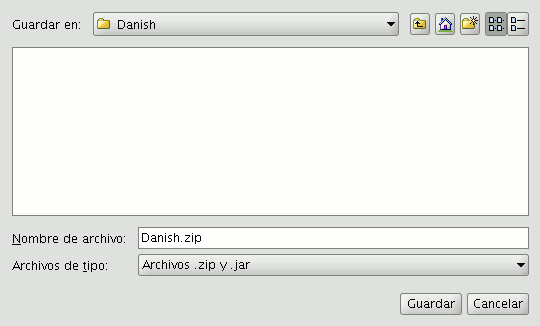
Saving the generated ZIP file
The above mentioned ZIP file has the same content as in the language updating case. The difference is in the .properties file of the language we are going to translate to, that in this case contains all the identifiers but empty.
In the previous figures, for example we are going to translate to the Danish language. Therefore, we need to edit the text_da.properties file. The contents of it should be something like:
searchButton=
enter_layer_name=
inside_circle=
ascending_order_tooltip=
time=
wfsLoad=
shp=
infocrs=
A2=
lowerCoordinates=
results=
discard_changes=
...
By opening the .properties file of one of the reference languages we could see the text that corresponds to each of the labels and thus proceed with the translation.
Once the translation is finished, we can recreate again the ZIP file with all the content and proceed to load the new language through the Instalar un idioma option. If we want to visualize the text in that language we would need to mark it as the active language and restart gvSIG.
Preferencias. Generar backup del gvp
Generar copia de seguridad al salvar proyecto
Backup project automatically before saving
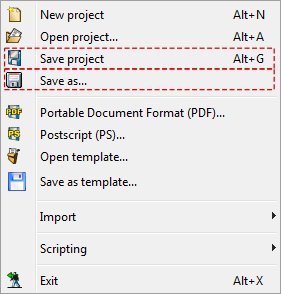
This extension can be found under the application's general preferences and allows the user to automatically backup a gvSIG project file (.gvp) before replacing it. The backup is created in the same directory as the original project, with the same name, and with a .bak extension. To enable automatic backup, select the third checkbox in the General section of the Application Preferences:
Menu
Vía the menu: Window → Preferences → General

Preferences menu
-----------------------------------
- Se ha producido un error en el documento Folders , accediendo a la imagen ventanaPreferenciasCarpetas_en.png, que probablemente no existe. Se han encontrado las siguientas alternativas [1, 2, 3, 4, ]
- Se ha producido un error en el documento Display configuration , accediendo a la imagen ventanaDePreferenciasConfiguracionPantalla_es.png, que probablemente no existe. Se han encontrado las siguientas alternativas [1, 2, 3, 4, ]
- Se ha producido un error en el documento Web browser , accediendo a la imagen NavegadorWeb_es.png, que probablemente no existe. Se han encontrado las siguientas alternativas [1, 2, 3, 4, ]
- Se ha producido un error en el documento Activate/Deactivate Extensions , accediendo a la imagen preferenciasExtensionesDesplegado_en.png, que probablemente no existe. Se han encontrado las siguientas alternativas [1, 2, ]
- Se ha producido un error en el documento Activate/Deactivate Extensions , accediendo a la imagen extensiones_en.png, que probablemente no existe. Se han encontrado las siguientas alternativas [1, 2, ]


